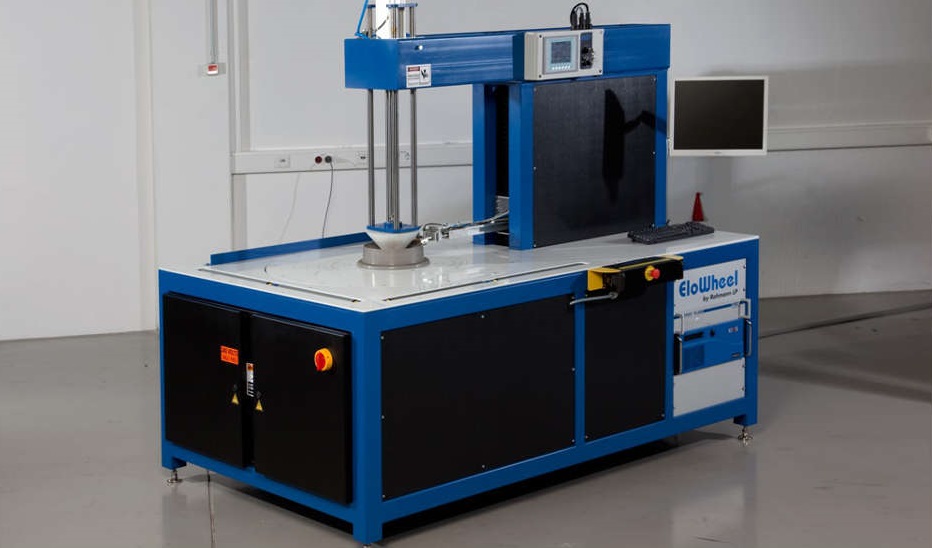
Eddy Current Aircraft Wheel Inspection System optimized for:
• Surface inspection
• Inspection for hidden cracks
• Conductivity measurement
• Bore hole inspection
General
With the RPT wheel inspection systems ROHMANN GmbH provides the operator with a modern and future-oriented system for the inspection of wheels (aircraft wheels and comparable components) that will also fulfil future requirements regarding the safety and the scope of the wheel inspection. The operator places the wheel half that is to be inspected onto the turntable and fastens it with a pneumatic clamping device. He then selects the corresponding wheel type from a list and completes the information by adding the serial number of the wheel half that is to be inspected. He then triggers the automatic inspection procedure that may consist of these tasks:
• automatic detection of surface cracks
• automatic inspection for hidden defects
• manual conductivity measurement
• manual bore hole inspection
The corresponding settings of the test instrument are automatically changed. The operator evaluates the results during or after the inspection. This evaluation along with the test results is saved and may be reproduced at any time in the future. If desired, test logs may be printed. Storing all test results in a database makes for easy access to prior inspections of the same wheel.
Scope of inspection
Surface inspection
• Sliding differential aircraft wheel probe featuring approximately 10mm (0.39”) active area (optional with ceramic wear protection)
• Area of inspection all the was to the end of the bead seat radius
• Reference defect depth 0.76mm (0.003”) x length 1.52mm (0.059”) x width 0.1mm (0.004”); EDM, tangentially and axially oriented.
Inspection of hidden cracks
• Sliding absolute aircraft wheel probe (combined with the surface probe)
• Area of inspection up to the beginning of the bead seat radius
• Reference defect approx. 30% damage to the wall thickness from the inside
• Depending on the structure
Option conductivity measurement
• Absolute conductivity probe as manual probe
• Measuring range conductivity: 0.5 IACS to 110 IACS
• Measuring uncertainty conductivity: ±1.0% of the measured value/±0.5 IACS (The greater value applies.)
Option bore hole inspection
• Hand-hand rotor with encoder for the manual bore hole inspection
• Graphic online display of each bore hole as a separate C-scan
• Reference defect 0.5mm (0.019”) x 2mm (0.078”) EDM
Aircraft Wheel dimensions
• Two basic systems featuring turntables with diameters of 600mm (23.62”) and 900mm (35.43”) are offered.
• Overall height: 45mm – approx. 500mm (1.77” – 19.68”)
• Diameter: 100mm – 600mm (resp. 900mm) (3.93 – 23.62“ resp. 35.43“)
• Weight: < 200kg (resp. 250kg) (440.92lbs resp. 551.15lbs)
• Bore holes: ø 5mm – 20mm (0.19 – 0.78”)
• Duration of the inspection for the automatic inspection procedure: approx. 30sec to 1.5min
System components
• Test stand with turn table and pneumatic wheel centering device
• Combined HF-/LF-probe
• Optional conductivity probe
• Optional rotor with interchangeable rotating probes
• ELOTEST PL320 eddy current test instrument
• System PC featuring Windows XP operating system
• Optional printer for the test logs
• Optional light protective grid
General technical data
• Ambient temperature: 10 – 40°C (49.99° – 104° F)
• Rel. humidity: 5 – 80%
• Required space: approx. 850 x 2200 x 1450mm (W x D x H) (33.64 x 86.61 x 57.08”) resp. 1200 x 2200 x 1600mm (47.24 x 86.61 x 62.99”)
• Elektr. connection: 250V/ 1kVA
• Compressed air: min. 6 bar, 1/4”, cleaned, dry